Make sure you get yours, only a few hours left.
https://barbraotten.myctmh.com/Retail/Products.aspx?CatalogID=1601
Saturday, June 12, 2010


Friday, June 11, 2010
College Survival Kit
My daughter just graduated from high school this past weekend and is getting ready to head off to college in the fall. She'll be staying in the dorms so I'm making her a college survival kit. Here's a sneak peek.


Do you like Stickers?
Thursday, June 10, 2010
Double your money, double your fun!
Did you check out today's Jackpot June special? Five different $22.95 stamp sets are up at low, low prices and ONE of them will activate the jackpot and give you a ribbon organizer, worth $16.95 FOR FREE!! Buy it here!
https://barbraotten.myctmh.com/Retail/Products.aspx?CatalogID=1601
https://barbraotten.myctmh.com/Retail/Products.aspx?CatalogID=1601
Tuesday, June 8, 2010
I'm Amazed! Goodie Box #3!
I'm so thrilled to tell you that another goodie box is up for sale on my website. Close to my Heart is going above and beyond to give you all some great deals this month. I love working for this company! Here's the info on today's deal!
Today is a Goodie Box day! Get a box filled with popular products at 50% or more off of retail value. Plus you'll get a deal on shipping/handling. Purchase this Goodie Box (retail value $120 US / $140.95 CAN) for only $60 US/ $70.50 CAN. Buy now! This offer is while supplies last and will be snatched up quickly. Get it here!
https://barbraotten.myctmh.com/Retail/Products.aspx?CatalogID=1601
Today is a Goodie Box day! Get a box filled with popular products at 50% or more off of retail value. Plus you'll get a deal on shipping/handling. Purchase this Goodie Box (retail value $120 US / $140.95 CAN) for only $60 US/ $70.50 CAN. Buy now! This offer is while supplies last and will be snatched up quickly. Get it here!
https://barbraotten.myctmh.com/Retail/Products.aspx?CatalogID=1601
Love you Forever
Just a quick tutorial for you today, my inlaws are visiting for my daughter's graduation so it's been a hectic week. The new Love You Forever stamp set is just so adorable that I couldn't help but by it. Have you ever read the Love You Forever children's book? Please do and bring your Kleenex with you when you do. It goes perfectly with the Topstitch paper because it just reminds me of babies. Cut your paper as follows:
Pink cardstock - 5 1/2 by 4 1/4
Blue cardstock - 5 1/4 by 4
White cardstock - 2 3/4 by 4 1/4
Patterned paper - 2 1/2 by 4 1/4
Pink cardstock - 2 1/4 by 2 1/2
Pattern paper - 1 by 1
Card base - 5 1/2 by 8 1/2
 Using your dry embossing tool and the groove in your paper trimmer, "draw" lines down your blue cardstock about 1/4" apart then sand them to expose the white core.
 On scrap paper, stamp the birds, branch and flowers and color in by using your blender pen and the colors that match your paper. I used baby pink, heavenly blue, chocolate, and sweet leaf. Remember not to "scrub" the color on or it will wet your paper. Cut it out carefully.
 Dry emboss the smaller pink paper like you did the large blue cardstock except this time in a grid pattern, sand it to show off the white core.
 Distress every part of the card with chocolate ink. Glue the blue cardstock to the pink card front. Attach the blue patterned paper to the white cardstock and then attach those two to the card front about 1 1/2" from top of the card. Attach the pink embossed cardstock 1 /2 " from the bottom of the card, 1/2" from the left hand side. Glue the stamped image to the pink cardstock as shown. Attach the three small squares as shown below, exact measurements are always a suggestion but you can put these about 3/4" from the top of the card for the first two (about 1/2" from right hand side of the card). For the third square, attach it about and inch from the left hand side and 1/2" up from bottom of the card. Glue the whole thing to your card base. Easy card, now you try it and don't forget to check out the special today at 11 a.m. EST at this link.

Pink cardstock - 5 1/2 by 4 1/4
Blue cardstock - 5 1/4 by 4
White cardstock - 2 3/4 by 4 1/4
Patterned paper - 2 1/2 by 4 1/4
Pink cardstock - 2 1/4 by 2 1/2
Pattern paper - 1 by 1
Card base - 5 1/2 by 8 1/2
 Using your dry embossing tool and the groove in your paper trimmer, "draw" lines down your blue cardstock about 1/4" apart then sand them to expose the white core.
 On scrap paper, stamp the birds, branch and flowers and color in by using your blender pen and the colors that match your paper. I used baby pink, heavenly blue, chocolate, and sweet leaf. Remember not to "scrub" the color on or it will wet your paper. Cut it out carefully.
 Dry emboss the smaller pink paper like you did the large blue cardstock except this time in a grid pattern, sand it to show off the white core.
 Distress every part of the card with chocolate ink. Glue the blue cardstock to the pink card front. Attach the blue patterned paper to the white cardstock and then attach those two to the card front about 1 1/2" from top of the card. Attach the pink embossed cardstock 1 /2 " from the bottom of the card, 1/2" from the left hand side. Glue the stamped image to the pink cardstock as shown. Attach the three small squares as shown below, exact measurements are always a suggestion but you can put these about 3/4" from the top of the card for the first two (about 1/2" from right hand side of the card). For the third square, attach it about and inch from the left hand side and 1/2" up from bottom of the card. Glue the whole thing to your card base. Easy card, now you try it and don't forget to check out the special today at 11 a.m. EST at this link.

Monday, June 7, 2010
Wow! Popular special!
Came home to find an excellent and popular special on my website today. Three orders in less than 1 hour! Do you want to know what the special is? Check it out here. https://barbraotten.myctmh.com/Retail/Products.aspx?CatalogID=1601
Sunday, June 6, 2010
It's a Twister!
First off I wanted to let you know that the June Jackpot special of the day is discounted Simple Snapshots album pages with a freebie of Color Ready alphabets if you hit the jackpot!
Now onto our adventure! Last night we were on our way to South Bend, Indiana at about 11:30 or so to pick up my husband's parents from the airport. There was a huge electrical thunderstorm with lightning flashing every second or so, extremely dramatic. All of a sudden, after receiving a call that the parents were evacuated from their plane, we turned around and the rain started. It was that kind of rain where you can't see five feet in front of you let alone the side of the road. We moved as slowly as we could trying to find a place to pull over and finally managed to find an overpass to hide under. We waited until the worst of it passed and then were able to get off the highway soon after. We arrived in Berrien Springs, Michigan and saw a path of debris up 139, people outside at nearly midnight with flashlights looking at the damage. This morning we went to Baroda to see what damage had occurred just miles from our house. You can see what we saw in both towns below.


Now onto our adventure! Last night we were on our way to South Bend, Indiana at about 11:30 or so to pick up my husband's parents from the airport. There was a huge electrical thunderstorm with lightning flashing every second or so, extremely dramatic. All of a sudden, after receiving a call that the parents were evacuated from their plane, we turned around and the rain started. It was that kind of rain where you can't see five feet in front of you let alone the side of the road. We moved as slowly as we could trying to find a place to pull over and finally managed to find an overpass to hide under. We waited until the worst of it passed and then were able to get off the highway soon after. We arrived in Berrien Springs, Michigan and saw a path of debris up 139, people outside at nearly midnight with flashlights looking at the damage. This morning we went to Baroda to see what damage had occurred just miles from our house. You can see what we saw in both towns below.


Saturday, June 5, 2010
Lots of goodies
Check out the new special today, too many different goodies to post, so just go to the link at the right and see if today is your June Jackpot day!!!
Friday, June 4, 2010
Goodie Box #2 is up!
The second goodie box is up on my Close to my Heart website for Jackpot June! It's worth $80 but you can buy it for $40, whoo hoo!! If you are worried about what comes in these, check out the types of products that came in last year's goodie boxes on the links below.
Buy yours HERE!
Goodie Box from 2009
Goodie Box from 2009
Goodie Box from 2009
Goodie Box from 2009
Now if you don't like mysteries and want to know exactly what you're getting for your money, check out what you get in our consultant kit. It's valued at $300 and only costs $99 plus shipping!! It also comes with a 22% discount on your future purchases. You can see what's in the kit here. Just turn to pages 106-107. If you are ready to sign up, the enrollment form is here. If you do sign up you need my sponsor number which is 9324322, I would love to have you join my team!
Have fun shopping!
Buy yours HERE!
Goodie Box from 2009
Goodie Box from 2009
Goodie Box from 2009
Goodie Box from 2009
Now if you don't like mysteries and want to know exactly what you're getting for your money, check out what you get in our consultant kit. It's valued at $300 and only costs $99 plus shipping!! It also comes with a 22% discount on your future purchases. You can see what's in the kit here. Just turn to pages 106-107. If you are ready to sign up, the enrollment form is here. If you do sign up you need my sponsor number which is 9324322, I would love to have you join my team!
Have fun shopping!
Thursday, June 3, 2010
Acrylic album peek
For those of you who are trying to win the acrylic album on the June Jackpot today, here's a peek at one I made. See more of it HERE!

Tutorial for June Stamp of the Month card!
This card is a 5 x 7 size, really fun to work with. I found these ruffled edged card bases at Staples. They are not folded, more like a postcard with just two sides. First off you're going to need to distress the edges with your sponge tool in barn red ink.
 Cut a piece of the wonderful Passages paper 4 3/4 by 6 3/4 and distress with barn red ink. Glue it down to the ruffled card.
 Cut a piece of the striped paper from the set 2 inches by 4 3/4 inches, distress and attach 1/2 inch up from the bottom of the card.
 Take your trimmer and a dry embossing tool and make grooves in a piece of cocoa paper that you cut 4 by 3 inches. Distress edges and sand lines to make them white. Glue 1/2 inch from left side of card and 3/4 inch from the top of the card.
 Stamp the watch (in black ink), sentiment and the word Dad (in barn red ink) from the Wonderful Friend stamp set on a 2 1/2 inch barn red circle, 2 by 1 inch brown bag rectangle and 1 1/4 by 3/4 inch brown bag rectangle respectively.
 Glue all pieces down as shown. Pop up the word "dad" with pop dots.
 Put off white waxy flax in four cocoa colored buttons and attach down right side with glue dots and you are finished! I hope to make a video to show you how to make the embossed lines this week!

 Cut a piece of the wonderful Passages paper 4 3/4 by 6 3/4 and distress with barn red ink. Glue it down to the ruffled card.
 Cut a piece of the striped paper from the set 2 inches by 4 3/4 inches, distress and attach 1/2 inch up from the bottom of the card.
 Take your trimmer and a dry embossing tool and make grooves in a piece of cocoa paper that you cut 4 by 3 inches. Distress edges and sand lines to make them white. Glue 1/2 inch from left side of card and 3/4 inch from the top of the card.
 Stamp the watch (in black ink), sentiment and the word Dad (in barn red ink) from the Wonderful Friend stamp set on a 2 1/2 inch barn red circle, 2 by 1 inch brown bag rectangle and 1 1/4 by 3/4 inch brown bag rectangle respectively.
 Glue all pieces down as shown. Pop up the word "dad" with pop dots.
 Put off white waxy flax in four cocoa colored buttons and attach down right side with glue dots and you are finished! I hope to make a video to show you how to make the embossed lines this week!

Wednesday, June 2, 2010
It's Goodie Box day!!
Today is a Goodie Box day! Today's box is worth $200 and you can get it for $80, whoo hoo! Don't miss out on this deal! Get a box filled with popular products at 50% or more off of retail value. Plus you'll get a deal on shipping/handling. Purchase this Goodie Box (retail value $200 US / $235.50 CAN) for only $80 US/ $93.95 CAN.
Buy now! This offer is while supplies last and will be snatched up quickly.
Here's the link to the DEAL!
For those who bought It's a Guy Thing, Level One paper pack yesterday, you hit the jackpot and the two ribbon packages will be yours for free!!
Buy now! This offer is while supplies last and will be snatched up quickly.
Here's the link to the DEAL!
For those who bought It's a Guy Thing, Level One paper pack yesterday, you hit the jackpot and the two ribbon packages will be yours for free!!
Happy June!
The June Jackpot special has started. Please see the details to the right. I had planned to get a tutorial up for yesterday's June stamp of the month card but my computer is on the fritz and it's the place where all of my photos are for that card. My husband promises to get me up and running tonight! In the meantime, please check out the June Jackpot special at 11:00 EST.
Monday, May 31, 2010
June 2010 Stamp of the Month Blog Hop
You know how you'll look at a paper set in the catalog and think that it's not for you and then you see it in person and LOVE IT? That's what happened to me with the paper set, Passages, so I'm showing it off to you and recommending it highly today.
I'm also very excited that the June Jackpot special is happening starting today so take a moment from your hop to see what's happening on my website HERE!
If you arrived here from TRACI'S BLOG you're in the right place. Check out the Father's Day card I made from the Wonderful Friend stamp set. I will post a tutorial on how to make this card tomorrow!

Now hop on over to CAROL'S BLOG and see her wonderful art!
I'm also very excited that the June Jackpot special is happening starting today so take a moment from your hop to see what's happening on my website HERE!
If you arrived here from TRACI'S BLOG you're in the right place. Check out the Father's Day card I made from the Wonderful Friend stamp set. I will post a tutorial on how to make this card tomorrow!

Now hop on over to CAROL'S BLOG and see her wonderful art!
June Stamp of the Month Blog Hop List
The Close to my Heart June Stamp of the Month blog hop starts tomorrow! You know what else starts tomorrow? Daily specials on my website, come see the June Jackpot sales, http://barbraotten.myctmh.com/
Kathleen Androlewicz http://bowlofstamps.blogspot.com/
Helen Onulak http://hookedonstamping.com/
Sheila Bennett http://sheila-bennett.blogspot.com/
Shannon Buck http://stampinbuds.blogspot.com/
Kim O'Rear http://kimorear.blogspot.com/
Nancy Brown http://creativelyartsygallery.blogspot.com/
Alison Mullen http://stickygirlstamps.com/
Latisha Haag http://domestichomefrontcoordinator.blogspot.com/
Laurie Newton http://scrapsfromthebeach.blogspot.com/
Jody Gustafson http://cre8nmemories.blogspot.com/
Annette Green http://annettescreativejourney.blogspot.com/
Chris Shouse http://houseostamps.wordpress.com/
Michelle Loncar http://michelleloncar.blogspot.com/
Susan Brooks http://stampingintheopen.blogspot.com/
Angela Tutton http://tuttonstreasures.blogspot.com/
Melissa Laverty http://fancymelissa.com/
Wanda Riley http://creatingwithwanda.blogspot.com/
Sylvia Jacquot http://stampinsylvia.blogspot.com/
Sarita Schraeder http://blessedscrapper.com/
Pamela O'Connor http://cherishyourmemories.blogspot.com/
Georgia Hauglid http://inkygeorgia.blogspot.com/
Caren Goldstein http://scrappycaren.blogspot.com/
Antoinette Herrin http://godblessyourart.blogspot.com/
Cindy Leek http://paperspadsandpictures.blogspot.com/
Kimberly Smith http://verykimberry.blogspot.com/
Krista Ritskes http://kristaritskes-simplycreating.blogspot.com/
Teri Baxter http://themidnightartist.blogspot.com/
Beth Naumann http://bethscreativeblock.blogspot.com/
Judy Burger http://makingtimeformemories.blogspot.com/
Dawn Heuft http://stamptildawn.blogspot.com/
Lori Leng http://pinkcloudscrappers.blogspot.com/
Lori Brown http://savingmine.blogspot.com/
Adeline Brill http://adeline-brill.blogspot.com/
Dawn Ross http://iamahappystamper.blogspot.com/
Katy Donaldson http://scrappinkaty.blogspot.com/
Jamia Bankhead http://papermadnessinc.blogspot.com/
Misty Jackson http://misstscraps.blogspot.com/
Haley Dyer http://inkyscrapper.blogspot.com/
Lori Miller http://clearlyfromtheheart.blogspot.com/
Terrie Dodd http://my-life-in-real-time.blogspot.com/
Carol Horton http://carol-scrappininparadise.blogspot.com/
Tammy Lea Pinchard http://mycreativeclubhouse.blogspot.com/
Amy Edwards http://paisleysplayhouse.blogspot.com/
Debra Van Patten http://memoriesoftheheartbydeb.blogspot.com/
Carla Ironside http://carlacreates.blogspot.com/
Jen Patrick http://roxybonds-scrappin.blogspot.com/
Mary Eisen http://mestamp2.blogspot.com/
Kristie Herdener http://goofyscrapper.blogspot.com/
Melissa Burch http://melissaburch.blogspot.com/
Traci Godbee http://createwithtraci.blogspot.com/
Danielle Chapman http://cupcake-stamper.blogspot.com/
Barbra Otten http://barbraotten.blogspot.com/
Laurie Levnik http://creationsbylaurie.blogspot.com/
Carol Loftus http://carolloftus.blogspot.com/
Brae Montgomery http://thebrae-er.blogspot.com/
Kami Welter http://scrappin4memories.blogspot.com/
Shirley Ross http://momnmescrap.blogspot.com/
Jen Rubio http://jenrubio.blogspot.com/
Deb Young http://scrapbookczar.blogspot.com/
Wendy Fording http://papercreationsbywendy.blogspot.com/
Melinda Everitt http://ifyoublingittheywillcome.blogspot.com/
Andrea Ewen http://ewenstyle.com/
Shannon Pelletier http://mycolorfulworldinvt.blogspot.com/
Janelle Jaksitz http://jaksscraps.blogspot.com/
Kathleen Androlewicz http://bowlofstamps.blogspot.com/
Helen Onulak http://hookedonstamping.com/
Sheila Bennett http://sheila-bennett.blogspot.com/
Shannon Buck http://stampinbuds.blogspot.com/
Kim O'Rear http://kimorear.blogspot.com/
Nancy Brown http://creativelyartsygallery.blogspot.com/
Alison Mullen http://stickygirlstamps.com/
Latisha Haag http://domestichomefrontcoordinator.blogspot.com/
Laurie Newton http://scrapsfromthebeach.blogspot.com/
Jody Gustafson http://cre8nmemories.blogspot.com/
Annette Green http://annettescreativejourney.blogspot.com/
Chris Shouse http://houseostamps.wordpress.com/
Michelle Loncar http://michelleloncar.blogspot.com/
Susan Brooks http://stampingintheopen.blogspot.com/
Angela Tutton http://tuttonstreasures.blogspot.com/
Melissa Laverty http://fancymelissa.com/
Wanda Riley http://creatingwithwanda.blogspot.com/
Sylvia Jacquot http://stampinsylvia.blogspot.com/
Sarita Schraeder http://blessedscrapper.com/
Pamela O'Connor http://cherishyourmemories.blogspot.com/
Georgia Hauglid http://inkygeorgia.blogspot.com/
Caren Goldstein http://scrappycaren.blogspot.com/
Antoinette Herrin http://godblessyourart.blogspot.com/
Cindy Leek http://paperspadsandpictures.blogspot.com/
Kimberly Smith http://verykimberry.blogspot.com/
Krista Ritskes http://kristaritskes-simplycreating.blogspot.com/
Teri Baxter http://themidnightartist.blogspot.com/
Beth Naumann http://bethscreativeblock.blogspot.com/
Judy Burger http://makingtimeformemories.blogspot.com/
Dawn Heuft http://stamptildawn.blogspot.com/
Lori Leng http://pinkcloudscrappers.blogspot.com/
Lori Brown http://savingmine.blogspot.com/
Adeline Brill http://adeline-brill.blogspot.com/
Dawn Ross http://iamahappystamper.blogspot.com/
Katy Donaldson http://scrappinkaty.blogspot.com/
Jamia Bankhead http://papermadnessinc.blogspot.com/
Misty Jackson http://misstscraps.blogspot.com/
Haley Dyer http://inkyscrapper.blogspot.com/
Lori Miller http://clearlyfromtheheart.blogspot.com/
Terrie Dodd http://my-life-in-real-time.blogspot.com/
Carol Horton http://carol-scrappininparadise.blogspot.com/
Tammy Lea Pinchard http://mycreativeclubhouse.blogspot.com/
Amy Edwards http://paisleysplayhouse.blogspot.com/
Debra Van Patten http://memoriesoftheheartbydeb.blogspot.com/
Carla Ironside http://carlacreates.blogspot.com/
Jen Patrick http://roxybonds-scrappin.blogspot.com/
Mary Eisen http://mestamp2.blogspot.com/
Kristie Herdener http://goofyscrapper.blogspot.com/
Melissa Burch http://melissaburch.blogspot.com/
Traci Godbee http://createwithtraci.blogspot.com/
Danielle Chapman http://cupcake-stamper.blogspot.com/
Barbra Otten http://barbraotten.blogspot.com/
Laurie Levnik http://creationsbylaurie.blogspot.com/
Carol Loftus http://carolloftus.blogspot.com/
Brae Montgomery http://thebrae-er.blogspot.com/
Kami Welter http://scrappin4memories.blogspot.com/
Shirley Ross http://momnmescrap.blogspot.com/
Jen Rubio http://jenrubio.blogspot.com/
Deb Young http://scrapbookczar.blogspot.com/
Wendy Fording http://papercreationsbywendy.blogspot.com/
Melinda Everitt http://ifyoublingittheywillcome.blogspot.com/
Andrea Ewen http://ewenstyle.com/
Shannon Pelletier http://mycolorfulworldinvt.blogspot.com/
Janelle Jaksitz http://jaksscraps.blogspot.com/
Tuesday, May 25, 2010
My Favorite Reason to be a Close to my Heart Consultant
In July, I'll be attending my second Close to my Heart convention and I'm counting down the days. It's the absolutely best part about being a consultant for Close to my Heart and I can't wait to attend the next convention in Washington D.C. Here are highlights from our last convention.
Sunday, May 23, 2010
Lots of news coming!
We're going to have another BIG website sale next month and I will be giving you the details this week.
See that big basket of brand new products on the Boyne Highlands post below? Right now I'm having a consultant special and you can find out the details on my newsletter so sign up HERE so you can find out all about it. So many people think there is a "catch" to buying the consultant kit that's worth more than $320.00 currently but there really isn't. You can simply buy it and never do another thing. I'm not a high pressure person and if you buy our kit only for the goodies in it (just $99 plus shipping)and for the discount the rest of your life I will not bug you to do more than that. I will share with you ideas on how to make money but it's up to you. There is so much you can get from Close to my Heart for free and I spell it out in my newsletter so sign up so you can read all about it. Also, you can go to sign up directly right HERE, put in my consultant number under the sponser information, 9324322.
Since we are having the website sale next month (an every day sale by the way) I will be posting lots of new tutorials throughout the month to show off our wonderful products! Hope to see you there, my website can be found HERE, remember the big sale won't start until June but even now we have some sales going on.
See that big basket of brand new products on the Boyne Highlands post below? Right now I'm having a consultant special and you can find out the details on my newsletter so sign up HERE so you can find out all about it. So many people think there is a "catch" to buying the consultant kit that's worth more than $320.00 currently but there really isn't. You can simply buy it and never do another thing. I'm not a high pressure person and if you buy our kit only for the goodies in it (just $99 plus shipping)and for the discount the rest of your life I will not bug you to do more than that. I will share with you ideas on how to make money but it's up to you. There is so much you can get from Close to my Heart for free and I spell it out in my newsletter so sign up so you can read all about it. Also, you can go to sign up directly right HERE, put in my consultant number under the sponser information, 9324322.
Since we are having the website sale next month (an every day sale by the way) I will be posting lots of new tutorials throughout the month to show off our wonderful products! Hope to see you there, my website can be found HERE, remember the big sale won't start until June but even now we have some sales going on.
Thursday, May 13, 2010
Boyne Highlands - Girls Just Wanna Crop - May 2010
If you've read my blog for awhile you've heard about the Girls Just Wanna Crop event up in Boyne Highlands, Michigan. Twice a year my friend, and fellow consultant, Valerie Black and I set up our booth up at this great crop and have a fabulous time meeting and getting to know the 300 croppers that attend. We've made so many friends and have even signed up many new consultants up at Boyne. One of the reasons is that we show the incredible amount of products a person can get for just $99 plus shipping and handling. What you see below is the entire basket of our summer deal. It includes the new Miracle kit and if you check out my newsletter (see how to subscribe to the right) you can get an extra bonus for signing up just from me.
 What's wonderful about the products that Close to my Heart put together for the new consultant kit is that everything matches. The inks and papers and embellishments are all meant to go together so you are set from the get go. Did you know that the minimum amount you need to sell to keep your 22% discount is only $300 in a quarter (that's 3 months to have your sales add up to $300). It's easy to do!
 We set up a big rack to show off the artwork you can do with our mini albums and our idea books. Would you believe we sold out of every idea book that we brought (and we brought a lot)! Our idea books are the best product we sell in my opinion.
 This year we borrowed a spinning rack to show off our accessories and embellishments. People had a lot of fun checking out the different goodies.
 We were lucky enough to have a brand new catalog come out on the third day of the event so we hid the new products under this tablecloth with a "no peeking" sign. We revealed the brand new papers, stamp sets and accessories at 10 a.m. on Saturday morning.
 We bring many stamp sets to all the Boyne events and show people how to create with them. There's nothing like actually being able to see what you're stamping.
 We wanted to say a big thank you to my downline, Connie Hagood, for lending us her new cool sign!!
 We brought tons of our catalog/idea books for people to look at and buy including the brand new summer catalog. You can see that catalog online at my website http://barbraotten.myctmh.com/. Just click on "products."
 The new Miracle kit is beautiful and I had such fun putting it together to show at Boyne. Did you know you can get it for just $5.00 with a $60 order. You can order from my website, just make sure to check the box for the Miracle kit down at the end of your order.
 I'm a paper-a-holic so it's not surprising that we brought a lot of paper to sell, I don't think we ended up taking much home because there are a lot of paper-a-holics attending Boyne!

We are so lucky to see some of the same diehard scrappers again and again at each Boyne event. We love seeing and spending time with them and also meeting the new Boyne scrappers too. This event repeats twice a year and it's truly one of the best crops I've ever seen. For more info check out http://www.boyne.com/ and click on the calender events for October. I believe they've already signed over 100 people so don't delay! Tell them Barbra sent you!
 What's wonderful about the products that Close to my Heart put together for the new consultant kit is that everything matches. The inks and papers and embellishments are all meant to go together so you are set from the get go. Did you know that the minimum amount you need to sell to keep your 22% discount is only $300 in a quarter (that's 3 months to have your sales add up to $300). It's easy to do!
 We set up a big rack to show off the artwork you can do with our mini albums and our idea books. Would you believe we sold out of every idea book that we brought (and we brought a lot)! Our idea books are the best product we sell in my opinion.
 This year we borrowed a spinning rack to show off our accessories and embellishments. People had a lot of fun checking out the different goodies.
 We were lucky enough to have a brand new catalog come out on the third day of the event so we hid the new products under this tablecloth with a "no peeking" sign. We revealed the brand new papers, stamp sets and accessories at 10 a.m. on Saturday morning.
 We bring many stamp sets to all the Boyne events and show people how to create with them. There's nothing like actually being able to see what you're stamping.
 We wanted to say a big thank you to my downline, Connie Hagood, for lending us her new cool sign!!
 We brought tons of our catalog/idea books for people to look at and buy including the brand new summer catalog. You can see that catalog online at my website http://barbraotten.myctmh.com/. Just click on "products."
 The new Miracle kit is beautiful and I had such fun putting it together to show at Boyne. Did you know you can get it for just $5.00 with a $60 order. You can order from my website, just make sure to check the box for the Miracle kit down at the end of your order.
 I'm a paper-a-holic so it's not surprising that we brought a lot of paper to sell, I don't think we ended up taking much home because there are a lot of paper-a-holics attending Boyne!

We are so lucky to see some of the same diehard scrappers again and again at each Boyne event. We love seeing and spending time with them and also meeting the new Boyne scrappers too. This event repeats twice a year and it's truly one of the best crops I've ever seen. For more info check out http://www.boyne.com/ and click on the calender events for October. I believe they've already signed over 100 people so don't delay! Tell them Barbra sent you!
Tuesday, May 4, 2010
Key to my Heart layout
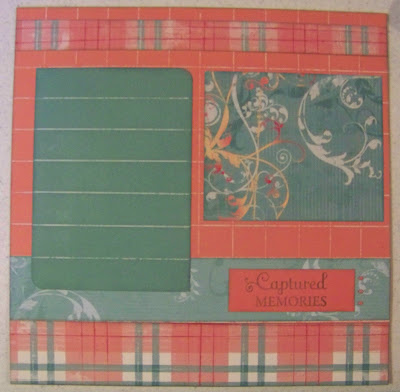
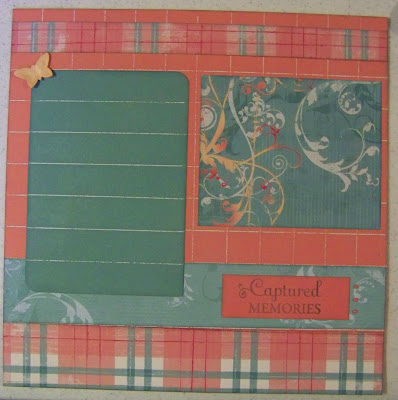
This coming weekend I'm going to be working at the Novi, Michigan Megameet, a scrapbooking and stamping expo with over 75 vendors showing off and selling their wares. At the Close to my Heart booth we will be selling page, album and card kits that are out of this world! I made up a bunch of them myself including this one below. Thanks to Laura C. for reminding me that it's time to put up another tutorial!
Since I had to send my actual pages ahead to the Megameet I will be estimating sizes below but that doesn't matter as you should always alter directions to fit your own photos. Key to my Heart paper was always one of my favorites. Unfortunately Close to my Heart only had it out for one month as a special. I scooped up a lot of it but it's gone now, goes to show you don't let your favorites get away. The colors are sorbet, juniper, creme brulee and tulip. You may ink distress all edges with juniper ink.
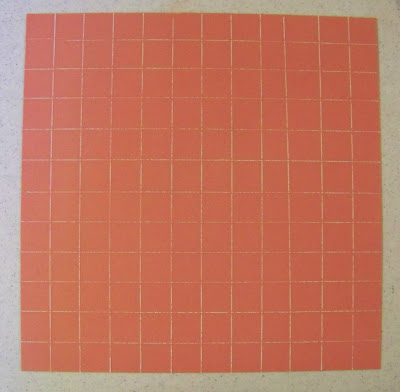
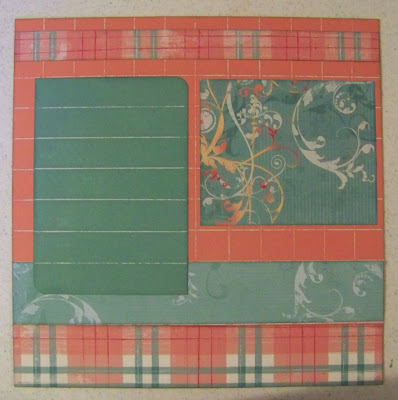
I'm big on dry embossing for cards and I use it occasionally for my layouts too. Because I was using a lot of cardstock on this layout and I love, love, love texture, I decided to actually dry emboss the whole 12 x 12 base page. You can too but taking your dry embossing tool and the groove in your trimmer to make a raised line on your paper. I made mine into 1" squares and then sanded them to show off the white core of our cardstock.
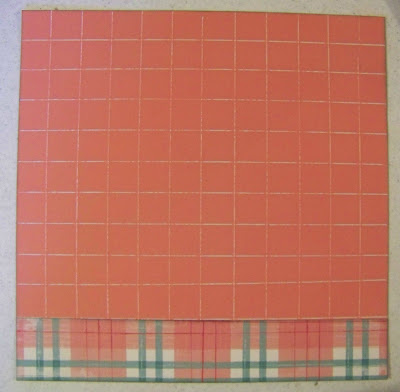
 Add a two inch by twelve inch strip of matching pattern paper flush with the bottom of the page.
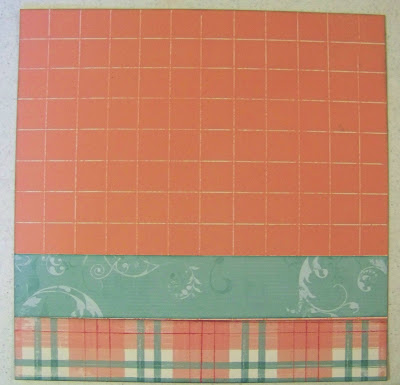
 Directly above that strip choose another pattern paper, cut it two inches by twelve inches and glue it down flush with edges.
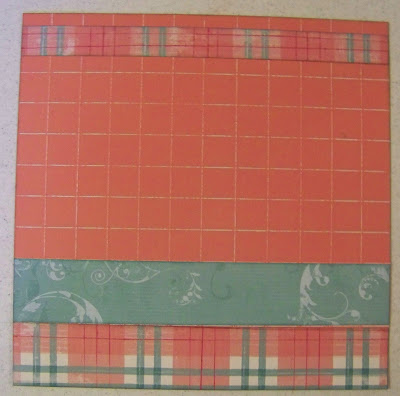
 At the top take another pattern paper or match one of the papers that you've already used and cut it one inch by twelve inches. Glue it down 1/2 inch from the top keeping edges flush.
 Cut a five by seven inch mat out of juniper cardstock. Dry emboss lines in it one inch apart and sand. Cut off the opposite corners with corner rounder. Add it to the page two inches from the top of page and one inch from left hand side.
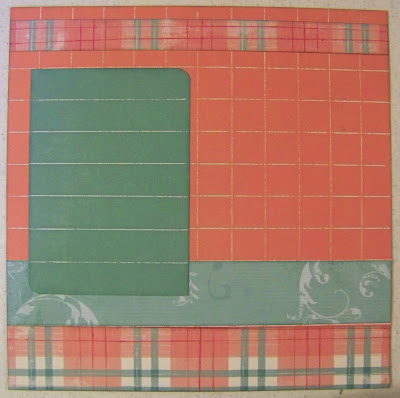 Add five by four inch pattern paper mat to the right of the other mat keeping it on the same embossed line, about 1/2 inch from juniper mat and right hand side of the page.
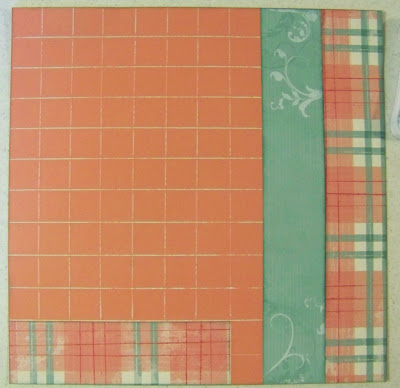
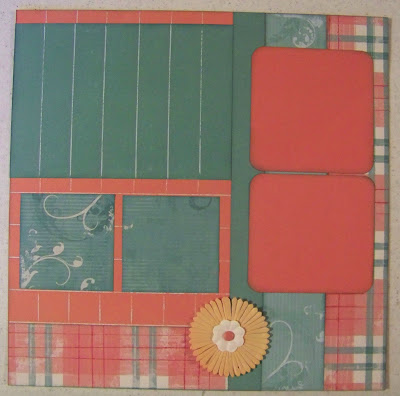
 On page two emboss your background as mentioned on page one. Glue down a two inch by twelve inch patterned paper strip vertically on the right hand side of the page keeping it flush with edges.
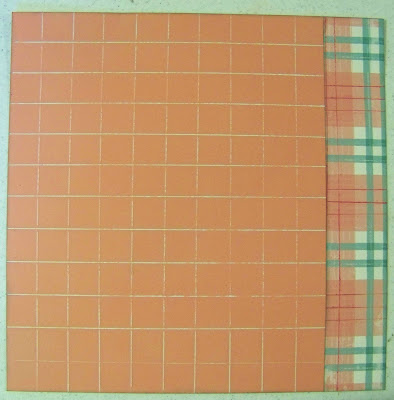 Cut another pattern piece two inches by twelve inches and attach next to first piece.
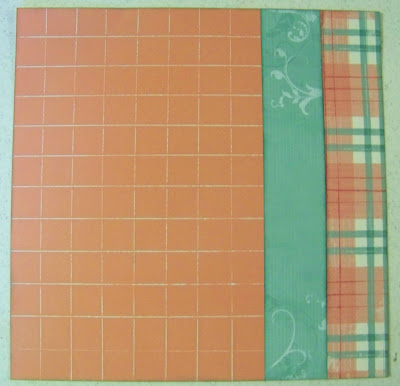 Cut another pattern paper (or use the same one as your first) seven by two inches and attach to the left bottom of the 12 x 12 page.
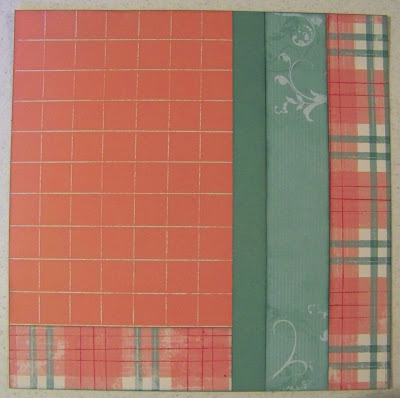
 Add juniper cardstock strip cut one by twelve inch and attach directly to the left of the first two pieces keeping edges flush.
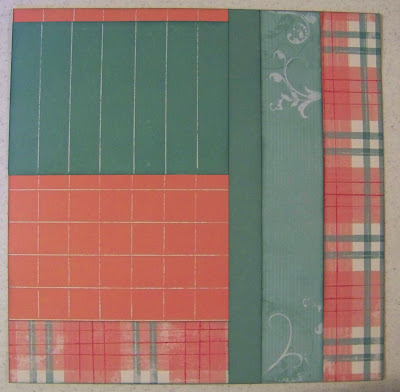
 Cut seven by five juniper cardstock piece, dry emboss lines one inch apart and sand. Add to 12 x 12 base page horizontally about 1/2 inch from top, flush with the left side as shown.
 Cut two three by three inch pieces out of pattern paper and glue centered under the juniper mat about a 1/2 inch down and 1/4 inch apart.
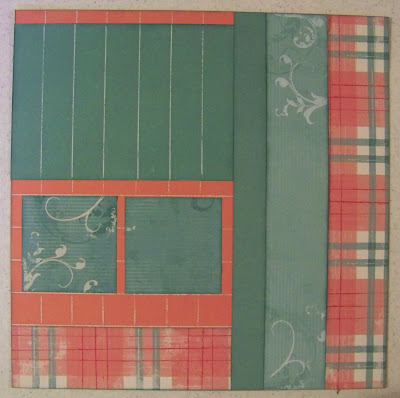 Add three by one inch title piece out of sorbet cardstock. Stamp it with the title of your choice. I used the Key to my Heart stamp set to title my page "Captured Memories." Add it about 1 1/2 inches from right hand side of page onto the second strip up from the bottom.
 Add one of our pretty little butterflies from our Just Blooms spring blossom set to the upper left of the juniper mat.
 Cut two four by four inch sorbet cardstock squares and cut off the corners with a rounder. Add them 1 1/2 inches down from the top of page, 1/2 inch from the right hand side of page. Have about 1/8 of an inch apart from each other. Add and layer the spring blossom flowers of your choice with a tulip brad in the center. Glue it just right of the bottom center of the page.
 Attach three juniper brads just under the first of the pattern paper mats.
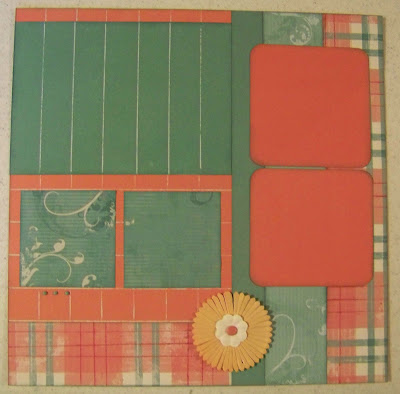 That's it, you're ready for pictures. Enjoy and come visit us at the megameet!

Since I had to send my actual pages ahead to the Megameet I will be estimating sizes below but that doesn't matter as you should always alter directions to fit your own photos. Key to my Heart paper was always one of my favorites. Unfortunately Close to my Heart only had it out for one month as a special. I scooped up a lot of it but it's gone now, goes to show you don't let your favorites get away. The colors are sorbet, juniper, creme brulee and tulip. You may ink distress all edges with juniper ink.
I'm big on dry embossing for cards and I use it occasionally for my layouts too. Because I was using a lot of cardstock on this layout and I love, love, love texture, I decided to actually dry emboss the whole 12 x 12 base page. You can too but taking your dry embossing tool and the groove in your trimmer to make a raised line on your paper. I made mine into 1" squares and then sanded them to show off the white core of our cardstock.
 Add a two inch by twelve inch strip of matching pattern paper flush with the bottom of the page.
 Directly above that strip choose another pattern paper, cut it two inches by twelve inches and glue it down flush with edges.
 At the top take another pattern paper or match one of the papers that you've already used and cut it one inch by twelve inches. Glue it down 1/2 inch from the top keeping edges flush.
 Cut a five by seven inch mat out of juniper cardstock. Dry emboss lines in it one inch apart and sand. Cut off the opposite corners with corner rounder. Add it to the page two inches from the top of page and one inch from left hand side.
 Add five by four inch pattern paper mat to the right of the other mat keeping it on the same embossed line, about 1/2 inch from juniper mat and right hand side of the page.
 On page two emboss your background as mentioned on page one. Glue down a two inch by twelve inch patterned paper strip vertically on the right hand side of the page keeping it flush with edges.
 Cut another pattern piece two inches by twelve inches and attach next to first piece.
 Cut another pattern paper (or use the same one as your first) seven by two inches and attach to the left bottom of the 12 x 12 page.
 Add juniper cardstock strip cut one by twelve inch and attach directly to the left of the first two pieces keeping edges flush.
 Cut seven by five juniper cardstock piece, dry emboss lines one inch apart and sand. Add to 12 x 12 base page horizontally about 1/2 inch from top, flush with the left side as shown.
 Cut two three by three inch pieces out of pattern paper and glue centered under the juniper mat about a 1/2 inch down and 1/4 inch apart.
 Add three by one inch title piece out of sorbet cardstock. Stamp it with the title of your choice. I used the Key to my Heart stamp set to title my page "Captured Memories." Add it about 1 1/2 inches from right hand side of page onto the second strip up from the bottom.
 Add one of our pretty little butterflies from our Just Blooms spring blossom set to the upper left of the juniper mat.
 Cut two four by four inch sorbet cardstock squares and cut off the corners with a rounder. Add them 1 1/2 inches down from the top of page, 1/2 inch from the right hand side of page. Have about 1/8 of an inch apart from each other. Add and layer the spring blossom flowers of your choice with a tulip brad in the center. Glue it just right of the bottom center of the page.
 Attach three juniper brads just under the first of the pattern paper mats.
 That's it, you're ready for pictures. Enjoy and come visit us at the megameet!

Subscribe to:
Posts (Atom)


 Posts


