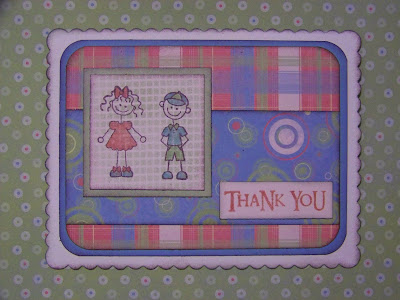
I put the word out that I was looking for ideas on what you all would like to see on my blog and Mickey, a friend of mine in Battle Creek, Michigan, requested thank you cards that her kids could send to thank friends and family for the gifts they received for Christmas. We also talked and decided to find an easy card that even her young children could make. Caboodle is the brand new paper from Close to my Heart and it's so cute you wouldn't believe it. Believe me, the catalog doesn't do it justice.

Instead of making a full card I decided to go with making a postcard so that's it's just one piece of paper with the design on front and on the back, it's blank. I had found some with cute ruffled edges at a store a few months ago so I pulled them out to make this card and a card I'll show you tomorrow. Postcards don't lend
themselves to lots of bulky
embellishments because you need them to lay flat so you can write your message so I chose not to use sparkles, buttons or ribbons on this, all something you can add if you want to later.
You'll need a piece of colonial white
cardstock cut 5 1/2 by 4 1/4 (like I said, I bought mine but it's not necessary to have one with ruffles or you could make them yourself with a punch).
Cut crystal blue
cardstock 5 by 3 3/4 and sweet leaf
cardstock 2 1/4 by 2 1/4.
Cut pattern paper 4 3/4 by 3 1/2, another pattern 4 3/4 by 2.
Cut colonial white
cardstock 2 by 2 and 2 by 1/2 inch.

Distress everything with cocoa ink. If you like you may cut corners with corner rounder. Glue down crystal blue large
cardstock to postcard.

Again, you may round the corners of the largest pattern paper piece, the attach directly in the center of the crystal blue
cardstock. Add second pattern paper strip 1/2 inch from the bottom of the card, flush with the edges of the larger pattern paper piece.

Take a piece of magic mesh and lay it over your small square colonial white piece and dab sweet leaf ink through it with a sponge tool. If you don't have magic mesh you can take a piece of plastic wrap or bubble wrap, ink it up and cover the small white piece. The objective is to add a cool texture.

This adds a lot to it instead of leaving it plain.

Stamp kids from the Family Ties - Children set onto the white paper. If you are picky about their face showing through the background, skip making the background. Add the stamped image to the sweet leaf
cardstock mat and attach to card about a 1/2 inch from top and left hand side of card.

Color in the kids by using a blender pen and your ink pad. Be careful not to go over the same spot more than once or it will wet your paper. Take your smallest piece of colonial white
cardstock and stamp "thank you" on it. This stamp is from Say it in Style. That's it for this card. Can you imagine how much it will mean to the person who receives it?


 Round the corners of the large sorbet and square sweet leaf cardstock pieces.
 Using your trimmer's groove and a dry embossing stylus make embossed lines about 1/2" apart vertically on your large sorbet paper.
 Sand so the white core shows.
 Glue to large sweet leaf card front.
 Attach sweet leaf pattern paper about 1" down from top of card.
 Do dry embossing lines 1/4" across both horizontally and vertically then sand. Attach about and inch and a half from bottom of the card, 1/4" from the left side.
 Glue down two of the buttercup squares 1/2" and 1 1/2" from right side of the card, about 3/4" from the top. Glue the third 3/4" from bottom of the card, 1" from the left hand side.
 Stamp butterfly from Friendship's Flight in buttercup ink and the outline in cocoa ink.
 Cut it out and glue it to the lower right of the card as shown.
 Add a sorbet brad in the center of each one of the squares. Use a glue pen to glue all lines and spots that you want to hold glitter on the butterfly.


 Instead of making a full card I decided to go with making a postcard so that's it's just one piece of paper with the design on front and on the back, it's blank. I had found some with cute ruffled edges at a store a few months ago so I pulled them out to make this card and a card I'll show you tomorrow. Postcards don't lend themselves to lots of bulky embellishments because you need them to lay flat so you can write your message so I chose not to use sparkles, buttons or ribbons on this, all something you can add if you want to later.
 Distress everything with cocoa ink. If you like you may cut corners with corner rounder. Glue down crystal blue large cardstock to postcard.
 Again, you may round the corners of the largest pattern paper piece, the attach directly in the center of the crystal blue cardstock. Add second pattern paper strip 1/2 inch from the bottom of the card, flush with the edges of the larger pattern paper piece.
 Take a piece of magic mesh and lay it over your small square colonial white piece and dab sweet leaf ink through it with a sponge tool. If you don't have magic mesh you can take a piece of plastic wrap or bubble wrap, ink it up and cover the small white piece. The objective is to add a cool texture.
 This adds a lot to it instead of leaving it plain.
 Stamp kids from the Family Ties - Children set onto the white paper. If you are picky about their face showing through the background, skip making the background. Add the stamped image to the sweet leaf cardstock mat and attach to card about a 1/2 inch from top and left hand side of card.
 Color in the kids by using a blender pen and your ink pad. Be careful not to go over the same spot more than once or it will wet your paper. Take your smallest piece of colonial white cardstock and stamp "thank you" on it. This stamp is from Say it in Style. That's it for this card. Can you imagine how much it will mean to the person who receives it?


 Posts


