Sunday, October 31, 2010

Halloween quotes, titles and songs!


I hope you all are having a happy halloween!! How about this year you get your layouts done right away! Below are Halloween quotes, layout titles and Halloween songs (with lyric links) to help you out. Have a great time tonight!

QUOTES:
As spirits roam the neighborhoods at night,
Let loose upon the Earth till it be light...
- Nicholas Gordon

When witches go riding,
and black cats are seen,
the moon laughs and whispers,
‘tis near Halloween.
- Author Unknown

'Tis the night - the night
Of the grave's delight,
And the warlocks are at their play;
Ye think that without
The wild winds shout,
But no, it is they - it is they.
- Arthur Cleveland Coxe

Shadows of a thousand years rise again unseen,
Voices whisper in the trees, "Tonight is Halloween!"
- Dexter Kozen

Double, double toil and trouble; fire burn and cauldron bubble.
- Shakespeare

From ghoulies and ghosties And long-leggedy beasties And things that go bump in the night, Good Lord, deliver us!
- Scottish Saying

TITLES:
A Haunting We Will Go

Candyland

Chills And Thrills

Eat, Drink and Be Scary

Gruesome Twosome

Spooked

SONGS:
The Monster Mash (LYRICS HERE)

Thriller (lyrics here)

Ghostbusters (lyrics here)

Thursday, October 28, 2010

Fall quotes for your scrapbooks and cards

Autumn is a second spring when every leaf is a flower. - Albert Camus

Autumn is a season followed immediately by looking forward to Spring. - Anonymous

Autumn, the year's last, loveliest smile. - William Cullen Bryant

There is a harmony in autumn, and a luster in its sky, which through the summer is not heard or seen, as if it could not be, as if it had not been! - Percy Bysshe Shelley

As the first leaves change their colors for autumn's big show, we welcome the cool crispness in the air. - Sheri Bresnahan

Every leaf speaks bliss to me, fluttering from the autumn tree." - Emily Bronte

Now if these inspire you to get to work on your pages, check out the new Olivia paper that is perfect for fall pictures.

Tuesday, October 26, 2010

Quick and Easy Thanksgiving Card

Wow, interesting day here in West Michigan. I had to spend much of the day in the family room in the basement due to that huge storm system that went across the entire midwest activating tornado warnings everywhere. Luckily all of my paper crafting supplies are down here and so I had a chance to make up just one more card kit for the card workshops I have coming up in November. This one is so easy. You just need some Olivia paper, a little ribbon and the Harvest Home stamp set.

1) Cut some barn red paper 5 1/2 by 4 1/4 inches.

2) Choosing three of your favorite papers from the Olivia set, cut one with a big pattern 4 by 2 1/2 inches and one less busy pattern paper 4 by 2 3/4 inches.

3) Cut some of the barely patterned paper 2 1/2 by 3 inches and a piece of barn red cardstock 2 3/4 by 3 1/4 inches.

4) Round the corners of the small barn red and plain pattern paper pieces.

5) Distress the edges of everything with cocoa ink.

6) Stamp the pumpkin on the Harvest Home stamp set in cocoa and color in (if you wish) with a blending pen and some sunset and sweet leaf ink on the plain pattern piece.

7) Glue that to the barn red piece.

8) Attach the bold pattern paper to the top of your card front barn red piece leaving about 1/8th of an inch border.

9) Add the less bold piece at the bottom, even overlapping the bold piece a bit making sure there is an 1/8th inch border.

10) Glue a piece of cocoa ribbon across the seam between the two pieces making sure to wrap around the back and glue. Cut small piece of ribbon, tie in knot and glue to left hand side of ribbon.

11) Stamp the May the Bounty phrase down at the bottom of the card as shown.

12) Using pop dots, attach the pumpkin piece 1 inch down from the top of the card, 1/4" from the right.

13) Cut a card base 8 1/2 by 5 1/2 inches, fold in half and glue your whole card to the card base.

Now, that was simple, right? You could make a ton of these. Click on these links below to buy your own paper, ribbon and stamp set in time for Thanksgiving.


Supplies: Olivia Level Two kit, Harvest Home Acrylix stamp set, Cocoa ribbon, Sunset ink,
Cocoa ink, Sweet Leaf ink, Pop Dots, Tombow Adhesive

The Beauty of their Dreams

Some of you may have noticed that I've changed my blog name from Can't Stop Dreaming to Scrapping with Heart. Even though I made the switch so that it would be easier for people to know what my blog is about, I still love my former title and, in fact, it is the name of my Close to my Heart team.

I am a big believer in going after my dreams and I really can't think of too many that haven't come true. I think that Eleanor Roosevelt understood that too. October is her birthday month having been born way back in 1884. I love that someone born so long ago still had the same visions for the future as I do. I'm so glad that CTMH put this quote from her on their Aspiration stamp set. It says it all.

"The future belongs to those who believe in the beauty of their dreams." Eleanor Roosevelt

I was inspired this morning by Vicki Wizniuk's gorgeous card. She is definitely a creative idol of mine. I made two cards, one for myself and an easier one for my upcoming card workshops. If you like the Aspiration stamp set, you can get one HERE!


Monday, October 25, 2010

Re-inker Crazy!

I usually show you the cards, layouts and paper crafts I'm proud of, but today I want to show you a mistake of mine. I own a re-inker for most all of my inks and I went a little re-inker crazy this weekend and re-inked every one of my inkpads. Not a good idea. When I went to work on a new card today I found that my inkpad was way too wet and here are the results of my excessive re-inker use.

See how dark the distressing is on the sides? The distressing was messy and I had trouble keeping my thumb out of the wet ink too. Once I started stamping, the stamp picked up too much ink and it started to bleed right off of the stamp. On the flower below, there isn't a really crisp look, it's especially obvious on the Thank You.

Now the card still looks okay but it would be so much better if I'd just applied a light touch with the re-inkers AND also determined whether it was necessary to use the re-inker at all. If your stamp pad is inking your stamped images just fine, don't use the re-inker. Save it for when you start to notice that the color is just not showing like it used to.

Like all of you, I make lots of mistakes as I'm learning to be a decent paper crafter. I want to share them from time to time so you can skip right over that problem. Re-inkers are an important tool to have, just use them with care. I do recommend you have re-inkers on hand for your most used colors. Cocoa, chocolate, and black are a good place to start. If you need them as yet another handy tool from Close to my Heart, CLICK HERE to pick up a few.

Sunday, October 24, 2010

Want to get some Christmas pictures scrapped?

After Thanksgiving I bet you'll be ready to get away for some "me time." On the 28th I'm having a Workshop on the Go class at my house in Stevensville, Michigan at 2:00. We will be working on the Mistletoe Workshop on the Go kit and making a two page layout. The kit contains:

1 – My Acrylix® All the Best Stamp Set (exclusive to this kit)
1 – Mistletoe Level 2 Paper Packet
1 – Mistletoe Level 2 Assortment
1 – Workshop Guide

Featured Colors: Cocoa, Cranberry, Garden Green, New England Ivy (I have these inks if you don't or you can EMAIL ME to order some of your own.)

Order the kit using the paypal link below or call me at (989) 906-6420 and it will be ready and waiting for you at my house on the 28th! If you can't make that date but still want the kit, click on the same paypay link or order directly from MY WEBSITE.

By the way, if you aren't a scrapbooker, this same kit teaches you how to make Christmas cards.


Saturday, October 23, 2010

Top ten scrapbooking supplies on my wish list

1. All the Workshops on the Go - After finishing the Olivia Workshop Kit I'm now dying to buy the other three, Mistletoe, Hooligans, and Magnifique.

2. The 12 x 12 cardstock packs for the eight new colors! I actually own a package of cardstock in every color Close to my Heart has. It took awhile to buy or earn them all but it's been so worth it. I never have to worry that I have the cardstock to match my pattern paper.

3. The "how to" books. Magic, Cherish, Imagine, Reflections, Wishes, and Originals are all on my wish list. You'd think that I'd have them all after 2 1/2 years with CTMH, right? Well, I did, I've have them all several times but my customers keep buying them from me. Over and over again I've ended up selling my own copies because you all have to have it!! Right now I have zero again, that will change soon!

4. Studio J! I have a year membership so that my layouts are super cheap and I have plans on making some fast layouts for Christmas albums for my mother and mother in law. It takes less than 20 minutes generally to make a two page layout so I'll whip these out quickly!

5. The Party Pennants stamp set. I have seen this set used in so many cute ways that I'm just dying to have it!

6. Brads! These must be my most used embellishment because I'm always running out. I need them in every color too, how about you?

7. Hooligans Level 2 Assortment. These cute little felt monsters are so popular that they keep running out of them. They are self-adhesive and adorable and I need more!

8. Irresistibles. I'm obsessed with these ever since we had that great Miracle kit promotion. When you ink these, the white designs stay white. Imagine being able to color these shapes any color you need to match your pages. They are truly magic. See me color one HERE.

9. Sanding kit. I see in the new catalog that they've even changed the design of this pretty set. I am a big dry embosser, as you know, so I have to have sanding ability!

10. Finally I have to have another craft tray. I use this all the time in my card workshops (I have several coming up, check out my calendar) and one isn't enough for all of you glitter obsessed crafters!!

So, thanks for reading my shopping wish list. Do you have one too? I'd love to hear about what's on your list. Did you know that if you make a wish list and give it to me, I can call up your significant other and let them know what you REALLY want for Christmas? I can even wrap it up! Call me if you need that service provided to help you get what you want! (989) 906-6420

Friday, October 22, 2010

How to make money your way!

When I was younger I worked as a waitress in a Pizza Hut for about a year. I was living on my own at the time and in college so money was a big deal for me. One of things I loved about being a waitress was knowing that every time I worked, I would come home with cold hard cash. I think that's definitely a factor in working as an independent consultant for Close to my Heart too. Each time I do a party I know that I'll come home with money. It doesn't come in the form of tips like it did when I was a waitress, instead it's a commission but I still revel in the knowledge that I get to bring that cash home.

I don't know about you but I'm not big on having bosses. With Close to my Heart, I choose what I do for work, when I want to work and who I'll work with. There's noone looking over my shoulder to micro-manage me. What freedom!! Imagine being in control of your income, your schedule and how hard you work! I know exactly how many parties I can do to bring home the amount of money I need for the month. Right now I'm working a lot. Check out my calendar HERE to see. The reason is that my daughter's tuition is coming due in December and I will probably be paying for the majority of it out of my check. In January I could choose not to work so much for whatever reason, the beauty is that I decide.

There are a lot of advantages to joining Close to my Heart like I did that have nothing to do with what you can choose to earn money-wise but I'm not discussing those today. Instead I want to talk about what we all seem to need in these trying times. Cold, hard cash. Wouldn't you like to be the one who is control of your own income? What difference would just a $100.00 extra a month make to you? How about $300? How about more? The thing is, with Close to my Heart, you decide. Another thing is that YOU CAN START RIGHT AWAY! No waiting for that first check. Just like getting a tip, you can walk away with cash from your very first party. If you want to be in control, consider signing up with me and Close to my Heart and I'll show you how!

Thursday, October 21, 2010

Do you like the 80's?

I was able to meet singer, Geoff Byrd, a few years back when he was touring with Hall and Oates. Here's a fun little 80's medley he did with buddy, Tony Floreno.

Holiday Marketplace Stop-N-Shop Perry, Michigan

I will be attending this event as a vendor, sounds like fun! Hope to see you there!

Holiday Marketplace Stop-N-Shop

November 7, 2010
10:00 AM - 3:00 PM

Perry City Hall Community Room
203 W. Polly Street 3rd Floor
Perry, MI

Come and join us for your one stop Christmas shopping needs!

Power in Motion 4th Annual Holiday Shopping Bazaar - St. Joseph, MI

I'll be attending this Bazaar as a vendor, I would love to see you there!

Power in Motion Gymnastics Parent Group's 4th Annual Holiday Shopping Bazaar will be on November 4th, 2010 in St. Joseph, Michigan. A percentage of the sales will go toward the competitive gymnastics teams for their meets and competitions. It is a night of endless shopping with vendors such as Close to my Heart, Tastefully Simple, Silpada, Party Lite and Pampered Chef (to name just a few) all under ONE roof at the same time!!!

Holiday Bazaar: Thursday, Nov 4, 2010 from 4:30 p.m. to 8:30 p.m. Location: Power In Motion Gymnastics & Fitness---located on M-139 across from the True Value complex in Royalton Twp in St. Joseph.

Wednesday, October 20, 2010

Autumn Projects To Fall For

Did you know that there is a new Close to my Heart FREE crafting video on my website every single month? This month's Art and Soul is called Autumn Projects to Fall For. Check it out and then see what products you now HAVE TO HAVE right HERE! If video doesn't look crisp and clear, click the dpi button (to the left of the letters "cc") and move it up to a higher dpi number.

Tuesday, October 19, 2010

Workshops on the Go

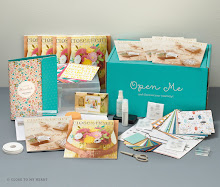
Don't you love it when you discover something new? Especially when it's something new in the world of crafting? Me too, in fact it happened to me this week. What's really funny though is that what I discovered wasn't new at all. For over a year now Close to my Heart had these Workshops on the Go kits and I've bought a few but never quite put a whole one together...until last Sunday. Now, I'm in love. Each kit has an exclusive stamp set, a Level Two paper pack (that means 22 sheets of our beautiful paper, a package of matching embellishments and, the best part of all, an instruction sheet to either make layouts or cards OR BOTH!! That's, right, actual instructions on how to make some beautiful projects! That means it requires very little creativity. I know how many of you out there "claim" to have not a creative bone in your body so here's your cure! We currently have a Workshop on the Go kit for all four of the beautiful brand new papers. All you have to do to see them is to CLICK HERE! I know if you try them you'll fall in love too. If you order the Mistletoe kit and live near me in Stevensville you may come and join us on November 28th at 2:00 to put it together. These are so easy, though, that you can do them right in your own home too! So now it's your turn to discover these wonderful kits too. Email me if you have any questions! caldreamin05@comcast.net

Here's a sneak peek of the Olivia kit.


Monday, October 18, 2010

Sign up for my newsletter!

I put coupons and offers in my newsletter that I'm not allowed to post on my Facebook or here on my blog so please sign up. I do not give your email address to anyone! Sign up here!

Tuesday, October 12, 2010

Halloween magnets

Now don't tell my team members but I couldn't resist sharing the awards I made to give to my top three sellers for the month of October. They won't get to see them til our team celebration next month. They are magnets so they can put them on their refrigerators to remind them of their accomplishments. I try to make each month's magnets unique and I LOVE making them. If you'd like to join my wonderful team and earn your own awards, email me at caldreamin05@comcast.net and let's make your dreams come true.

Monday, October 11, 2010

Easy card tricks

Nope, this is not about how to do magic, at least not with playing cards. It's how to do magic when you're making greeting cards. I'll tell you my secret. I don't come up with a lot of card ideas, I just come up with a lot of variations on cards I already have. Take, for instance, the one below. It's made with the Ice Crystals stamp set by Close to my Heart. It's one of the cards my customers make at my Christmas card workshops (call me to schedule one of your own). I love this card, so much that I wanted to come up with some other versions of it. Complete directions for this card can be found in my newsletter, sign up HERE.

While having trouble sleeping one early morning I was thinking about how I could make this card differently. I thought about reversing the pattern of the card by putting words in the random stamping area and a stamped picture on the little oval. The result was this. With a little dry embossing and going vertical instead of horizontal, the card is brand new. The Peace on Earth saying comes from Say It In Style (my most used stamp set) and the little sleigh comes from Snow Days.

Here's another look. Instead of cutting the randomly stamped piece horizontally, I cut them vertically. I rounded the corners of the brown paper and moved the horse and sleigh. I also skipped the dry embossing.

This last card is the one I'll teach you today. It's still the same card pattern, just changed some of the parts.

Cut a piece of white paper 3 inches by 4 1/4 inches. Using the Peace on Earth image, stamp it on the paper (held vertically) in brown bag ink. Move it around so that your lines are straight but let it go off the paper at some points (it's supposed to be random, remember)?

Using Moonstruck ink, do the same thing, leaving space for the next two colors, lagoon and heavenly blue. Fill in by using just the left or right hand side of the stamp until the page is full.

Cut a piece of brown bag cardstock 5 1/4 by 4 inches. Using your paper trimmer and a dry embossing tools, draw lines about 1/8" apart around the outer edge of the piece. Sand to show off the white core of our paper. (All cardstock doesn't do this, paper must have a white core).

Cut a piece of moonstruck cardstock 5 1/2 by 4 1/4 inches. Round the corners off from both pieces and distress edges with moonstruck ink. Attach the brown paper in center of blue.

Cut moonstruck paper 3 1/2 by 4 3/4 inches. Cut heavenly blue paper 3 by 4 1/4 inches and round the corners. Distress both and attach to center of card.

Cut your randomly stamped paper. Cut an inch off top and inch off bottom. This will leave you with a wide center piece. Round upper corners of one of the one inch pieces and the bottom two corners of the other one inch piece. Distress and attach to card. Add a matching ribbon about two thirds of the way down the card. Cut a small piece of ribbon, tie in knot and glue down to flat ribbon.

Stamp the sleigh and horse to small punched oval in brown bag, distress and add to scalloped oval piece (distress that also).

Add the stamped image to bottom right of the card (or top right, whatever you like). Attach whole card front to card base that you've cut 8 1/2 by 5 1/2 inches (fold in half and round corners). I would love and post your own versions of cards you work your own magic on, just send them to my email! caldreamin05@comcast.net